Codelab ini menyediakan tutorial langkah demi langkah tentang cara mengkonfigurasi tool (tool) Agent Development Kit (ADK) untuk menggunakan otentikasi Google Sign-In dengan OAuth 2.0. Ini memungkinkan tool Anda mengakses data pengguna yang dilindungi dari layanan Google (seperti Google Kalender, Gmail, dll.).
Prasyarat
- Pemahaman tentang konsep Generative AI
- Kemahiran dasar dalam pemrograman Python
- Konfigurasi Google Cloud Services
- Membuat virtual environment di Python
Apa yang akan Anda pelajari
- Memberikan keterampilan baru kepada agen Anda dengan membangun fungsi Python khusus sebagai tool.
- Menghubungkan agen Anda ke informasi real-time menggunakan tool bawaan seperti Google Search.
- Menstrukturkan agen multi-tool dengan membuat sub-agen khusus untuk tugas yang kompleks.
- Mengintegrasikan tool dari kerangka kerja AI populer seperti LangChain untuk memperluas kemampuan dengan cepat.
Apa yang Anda butuhkan
- Komputer yang berfungsi dan koneksi wifi yang andal
- Peramban, seperti Chrome, untuk mengakses Google Cloud Console
- Pikiran yang ingin tahu dan semangat untuk belajar
Sebuah agen dasar yang dibangun dengan ADK (Agent Development Kit) memiliki otak LLM yang kuat, tetapi ia juga memiliki keterbatasan: ia tidak dapat mengakses informasi yang dibuat setelah tanggal pelatihannya, dan ia tidak dapat berinteraksi dengan layanan eksternal. Ini seperti seorang asisten brilian dan cerdas secara teori yang terkunci di perpustakaan tanpa telepon atau internet. Untuk membuat sebuah agen benar-benar berguna, kita perlu memberinya tool.
Bayangkan tool sebagai pemberian akses ke dunia luar kepada asisten AI tersebut: sebuah kalkulator, peramban web, atau akses ke basis data perusahaan tertentu. Dalam ADK, sebuah tool adalah bagian kode modular yang memungkinkan agen untuk melakukan tindakan spesifik seperti mencari data real-time atau memanggil API eksternal. Menggunakan tool memperluas kemampuannya jauh melampaui percakapan sederhana.
ADK menawarkan tiga kategori tool:
- Function Tools: Tool kustom yang Anda kembangkan untuk memenuhi persyaratan unik aplikasi Anda, seperti fungsi yang telah ditentukan (predefined functions) dan agen.
- Built-in Tools: Tool siap pakai yang disediakan oleh framework untuk operasi umum, seperti Google Search dan Code Execution (Eksekusi Kode).
- Third-party Tools: Library eksternal populer seperti Serper dan tool dari LangChain dan CrewAI.
Untuk mempelajari lebih lanjut tentang penggunaan Tool dengan ADK Agents, lihat dokumentasi resmi. Dalam codelab ini, kita akan menambahkan tool untuk mengubah agen sederhana kita menjadi asisten perjalanan pribadi yang cakap. Mari kita mulai!
Buat project Google Cloud
Mulailah dengan membuat project Google Cloud baru agar aktivitas dari codelab ini hanya diisolasi dalam project baru ini.
- Buka console.cloud.google.com/projectcreate
- Masukkan informasi yang diperlukan:
- Nama project - Anda dapat memasukkan nama apa pun yang diinginkan (misalnya, genai-workshop)
- Lokasi - biarkan sebagai Tidak Ada Organisasi
- Akun penagihan - Jika Anda melihat opsi ini, pilih Akun Penagihan Uji Coba Google Cloud Platform. Jangan khawatir jika Anda tidak melihat opsi ini. Lanjutkan saja ke langkah berikutnya.
- Salin Project ID yang dibuat, Anda akan memerlukannya nanti.
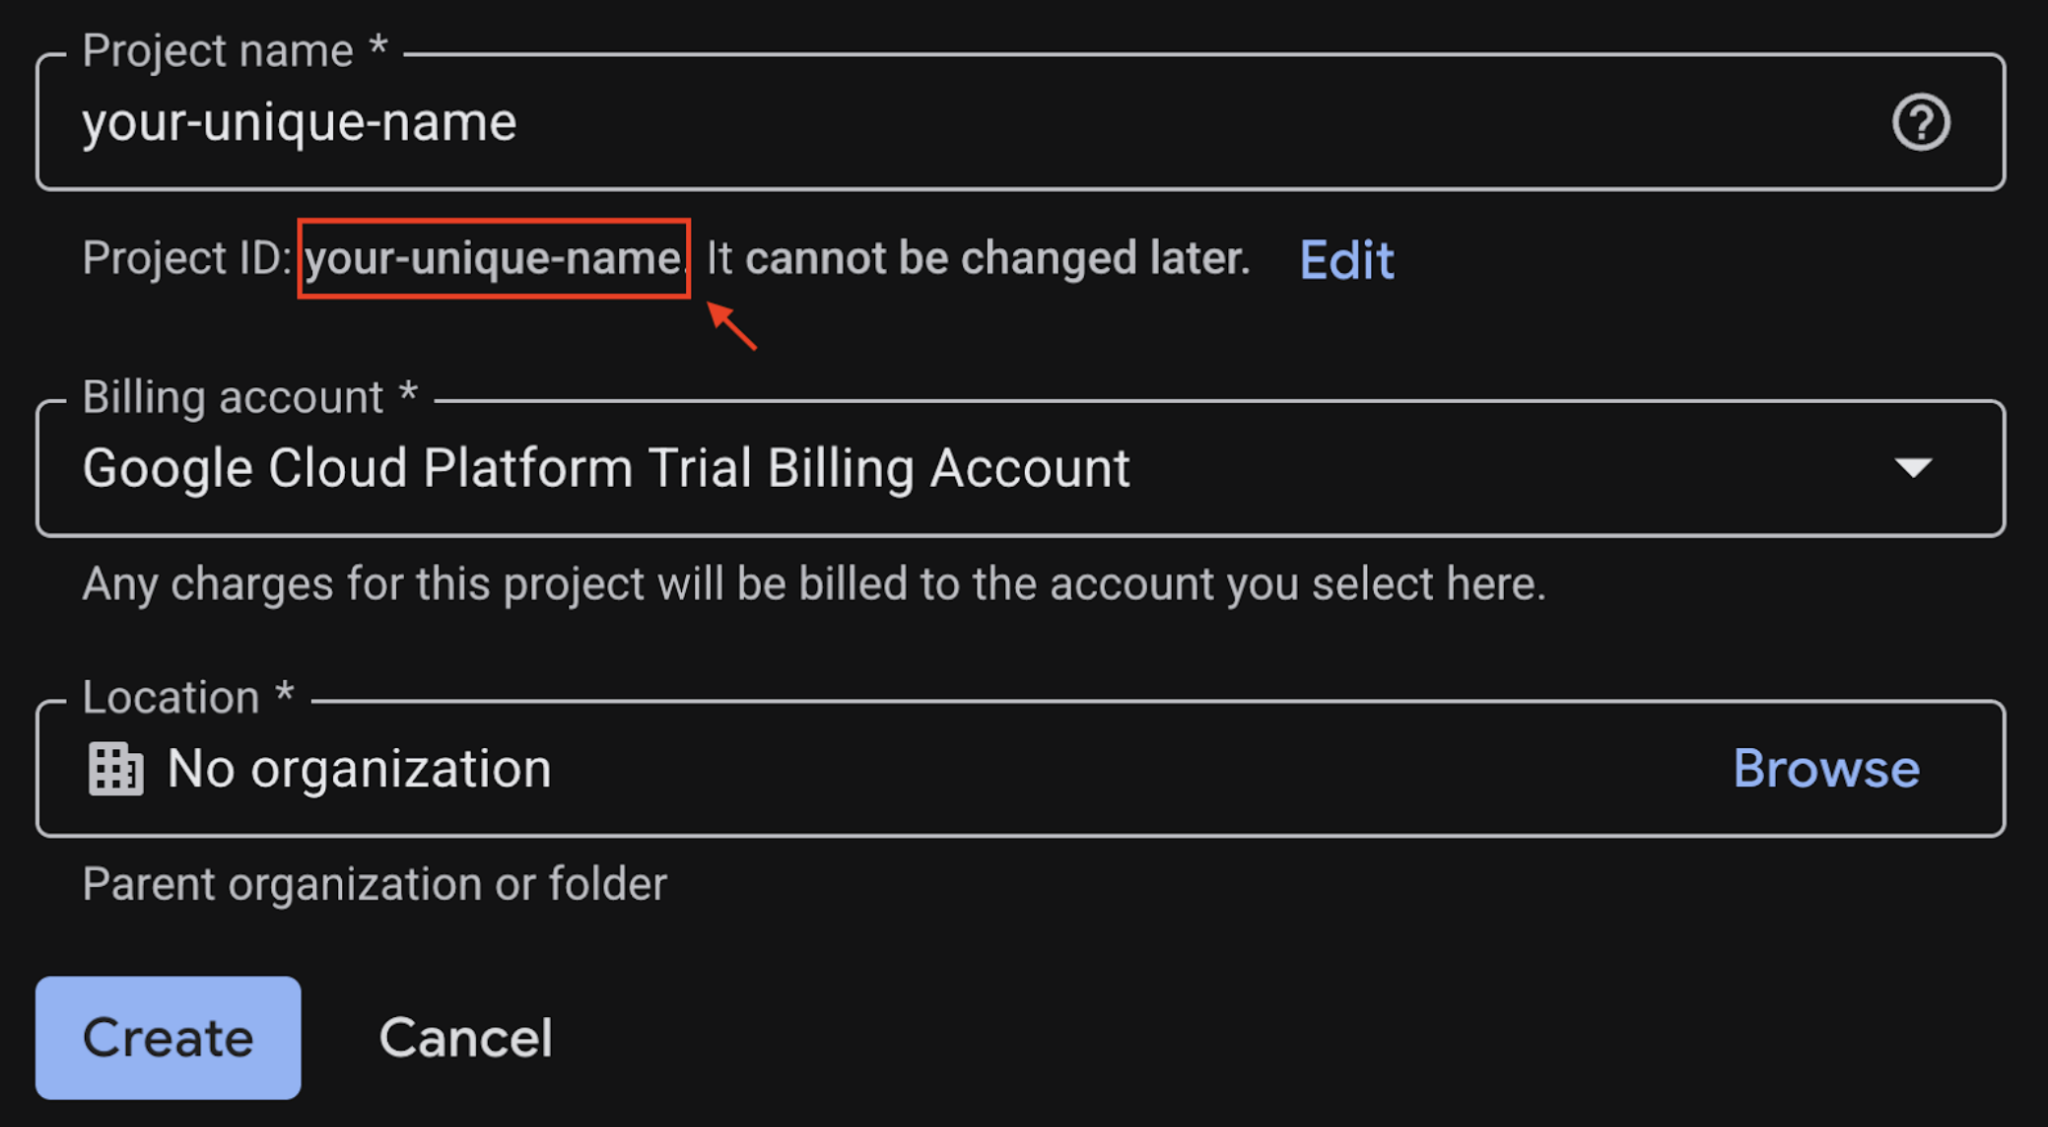
- Jika semuanya sudah sesuai, klik tombol Buat
Mengkonfigurasi Cloud Shell
Setelah project Anda berhasil dibuat, lakukan langkah-langkah berikut untuk menyiapkan Cloud Shell.
1. Luncurkan Cloud Shell
Buka shell.cloud.google.com dan jika Anda melihat pop-up yang meminta Anda untuk memberikan otorisasi, klik Authorize.
2. Tetapkan ID Project
Jalankan perintah berikut di terminal Cloud Shell untuk menetapkan Project ID yang benar. Ganti <your-project-id> dengan Project ID Anda yang sebenarnya, yang disalin dari langkah pembuatan project di atas.
gcloud config set project <your-project-id>Sekarang Anda akan melihat bahwa project yang benar dipilih di terminal Cloud Shell. Project ID yang dipilih ditandai dengan warna kuning.
3. Mengaktifkan API yang diperlukan
Untuk menggunakan layanan Google Cloud, Anda harus mengaktifkan API masing-masing layanan terlebih dahulu untuk project Anda. Jalankan perintah di bawah di terminal Cloud Shell untuk mengaktifkan layanan untuk Codelab ini:
gcloud services enable aiplatform.googleapis.comJika operasi berhasil, Anda akan melihat Operation/... finished successfully dicetak di terminal.
Sebelum memulai project Python, sebaiknya buat lingkungan virtual. Hal ini mengisolasi dependensi project, sehingga mencegah konflik dengan project lain atau paket Python global sistem.
1. Buat direktori project dan buka direktori tersebut:
mkdir ai-agents-adk
cd ai-agents-adk
2. Buat dan aktifkan lingkungan virtual:
uv venv --python 3.12
source .venv/bin/activate
Anda akan melihat (ai-agents-adk) yang mengawali perintah terminal, yang menunjukkan bahwa lingkungan virtual aktif.
3. Instal halaman adk
uv pip install google-adkSetelah lingkungan Anda siap, saatnya membuat fondasi agen AI Anda. ADK memerlukan beberapa file untuk menentukan logika dan konfigurasi agen Anda:
agent.py: Berisi kode Python utama agen Anda, yang menentukan nama, LLM yang digunakan, dan petunjuk intinya.__init__.py: Menandai direktori sebagai paket Python, membantu ADK menemukan dan memuat definisi agen Anda..env: Menyimpan informasi sensitif dan variabel konfigurasi seperti kunci API, Project ID, dan lokasi.
Perintah ini akan membuat direktori baru bernama personal_assistant yang berisi tiga file penting.
adk create personal_assistantSetelah perintah dijalankan, Anda akan diminta memilih beberapa opsi untuk mengkonfigurasi agen.
Untuk langkah pertama, pilih opsi 1 untuk menggunakan model gemini-2.5-flash, model cepat dan efisien yang sempurna untuk tugas percakapan.
Choose a model for the root agent:
1. gemini-2.5-flash
2. Other models (fill later)
Choose model (1, 2): 1
Untuk langkah kedua, pilih Vertex AI (opsi 2), platform AI terkelola yang canggih dari Google Cloud, sebagai penyedia layanan backend.
1. Google AI
2. Vertex AI
Choose a backend (1, 2): 2
Setelah itu, Anda perlu memverifikasi bahwa Project ID yang ditampilkan dalam tanda kurung [...] telah ditetapkan dengan benar. Jika ya, tekan Enter. Jika tidak, masukkan Project ID yang benar di dialog berikut:
Enter Google Cloud project ID [your-project-id]:Terakhir, tekan Enter pada pertanyaan berikutnya, untuk menggunakan us-central1 sebagai region untuk codelab ini.
Enter Google Cloud region [us-central1]:Anda akan melihat output yang serupa di terminal.
Agent created in /home/<your-username>/ai-agent-adk/personal_assistant:
- .env
- __init__.py
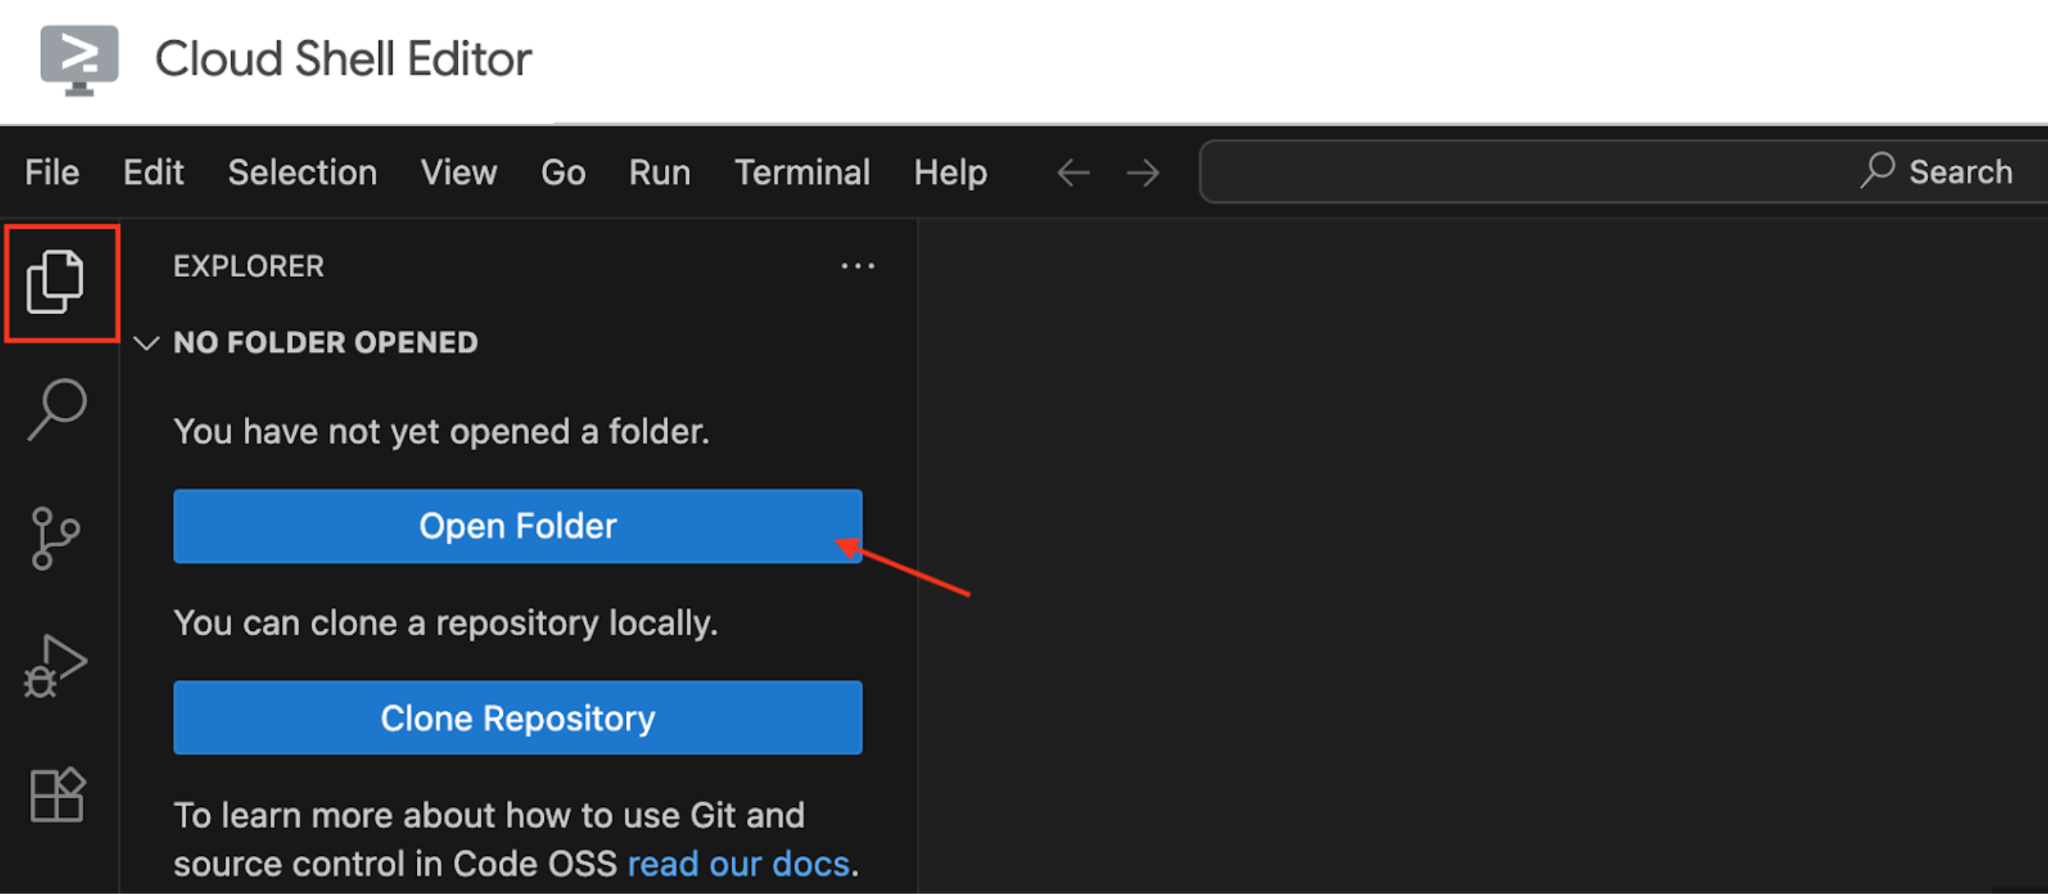
- agent.pyUntuk melihat file yang dibuat, buka folder ai-agents-adk di Cloud Shell Editor.
- Klik File > Open Folder... di menu atas.
- Cari dan pilih folder
ai-agents-adk - Klik Oke.
Jika panel menu atas tidak muncul, Anda juga dapat mengklik ikon folder dan memilih Buka Folder.
Catatan: Anda dapat menggunakan editor command line seperti Vim, tetapi Anda harus mengetahui perintah untuk keluar dari Vim sendiri.
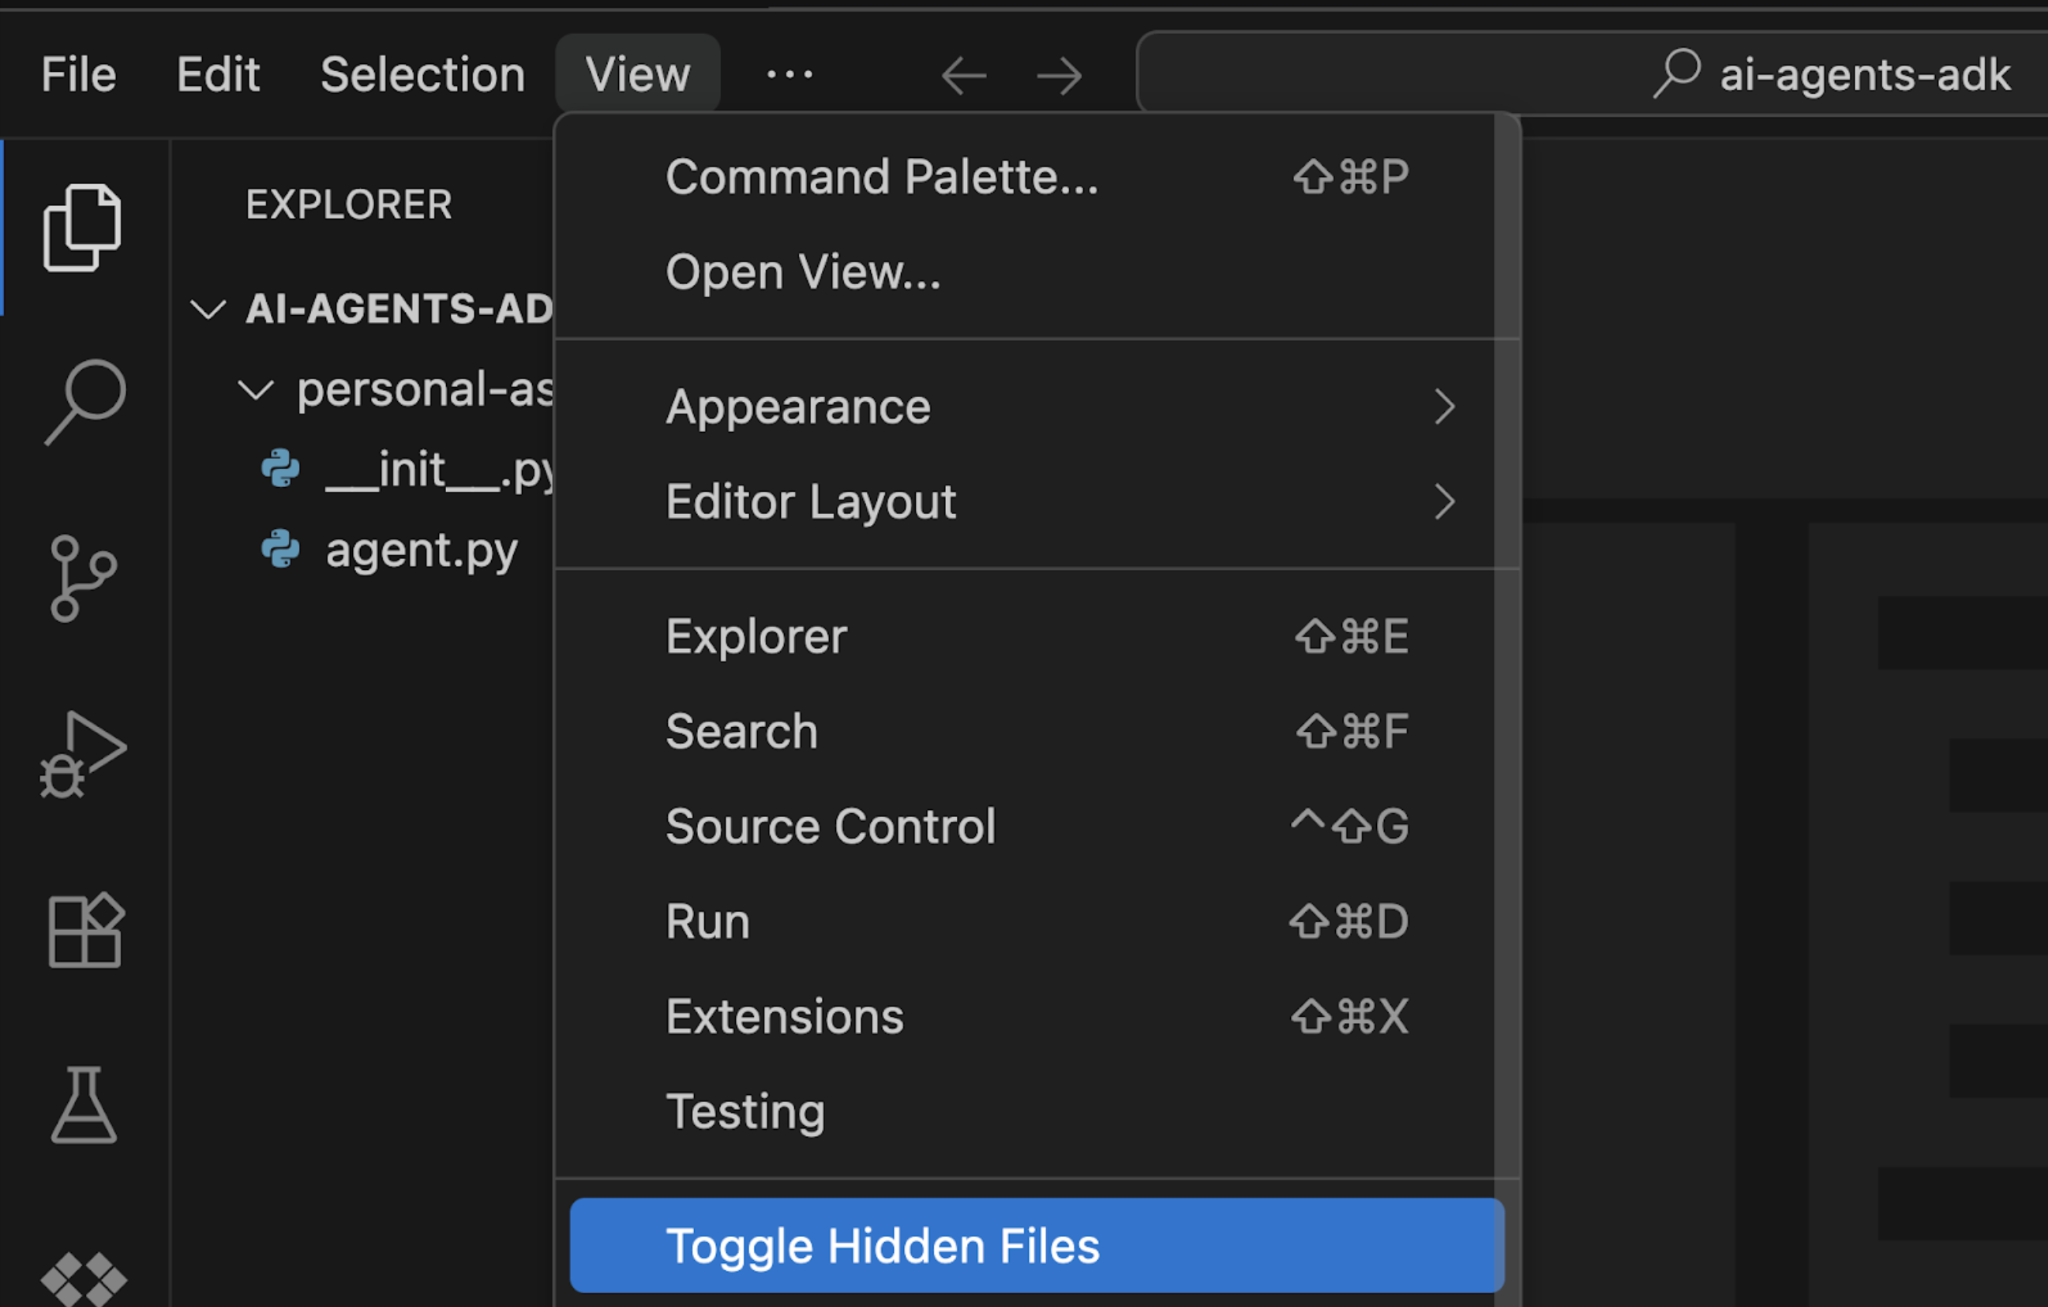
Setelah jendela Editor dimuat sepenuhnya, buka folder personal-assistant. Anda akan melihat file yang diperlukan seperti yang disebutkan di atas (agent.py, __init__.py, dan .env).
File .env sering disembunyikan secara default. Agar dapat terlihat di Cloud Shell Editor:
- Buka menu bar di bagian atas,
- Klik View, dan
- Pilih Toggle Hidden Files.
Jelajahi konten setiap file.
agent.py
File ini membuat instance agen Anda menggunakan class Agent dari library google.adk.agents.
from google.adk.agents import Agent


root_agent = Agent(
    model='gemini-2.5-flash',
    name='root_agent',
    description='A helpful assistant for user questions.',
    instruction='Answer user questions to the best of your knowledge',
)
from google.adk.agents import Agent: Baris ini mengimpor class Agent yang diperlukan dari library ADK.root_agent = Agent(...): Di sini, Anda membuat instance agen AI Anda.name="root_agent": ID unik untuk agen Anda. Dengan demikian, ADK akan mengenali dan merujuk agen Anda.model="gemini-2.5-flash": Parameter penting ini menentukan Model Bahasa Besar (LLM) mana yang akan digunakan agen Anda sebagai "otak" dasarnya untuk memahami, menalar, dan menghasilkan respons. gemini-2.5-flash adalah model yang cepat dan efisien yang cocok untuk tugas percakapan.description="...": Memberikan ringkasan singkat tentang tujuan atau kemampuan agen. Deskripsi lebih ditujukan untuk pemahaman manusia atau untuk agen lain dalam sistem multi-agen agar memahami fungsi agen tertentu ini. Sering digunakan untuk logging, proses debug, atau saat menampilkan informasi tentang agen.instruction="...": Ini adalah perintah sistem yang memandu perilaku agen Anda dan menentukan personanya. Hal ini memberi tahu LLM cara bertindak dan tujuan utamanya. Dalam hal ini, perintah menetapkan agen sebagai "asisten yang membantu". Petunjuk ini sangat penting untuk membentuk gaya dan kemampuan percakapan agen.
init.py
File ini diperlukan agar Python mengenali personal-assistant sebagai paket, sehingga ADK dapat mengimpor file agent.py Anda dengan benar.
from . import agentfrom . import agent: Baris ini melakukan impor relatif, yang memberi tahu Python untuk mencari modul bernama agent (yang sesuai denganagent.py) dalam paket saat ini (personal-assistant). Baris sederhana ini memastikan bahwa saat ADK mencoba memuat agenpersonal-assistantAnda, ADK dapat menemukan dan menginisialisasiroot_agentyang ditentukan dalamagent.py. Meskipun kosong, keberadaan__init__.py-lah yang membuat direktori menjadi paket Python.
.env
File ini menyimpan konfigurasi khusus lingkungan dan kredensial sensitif.
GOOGLE_GENAI_USE_VERTEXAI=1
GOOGLE_CLOUD_PROJECT=YOUR_PROJECT_ID
GOOGLE_CLOUD_LOCATION=YOUR_PROJECT_LOCATIONGOOGLE_GENAI_USE_VERTEXAI: Memberi tahu ADK bahwa Anda bermaksud menggunakan layanan Vertex AI Google untuk operasi AI Generatif Anda. Hal ini penting untuk memanfaatkan layanan terkelola dan model lanjutan Google Cloud.GOOGLE_CLOUD_PROJECT: Variabel ini akan menyimpan ID unik Project Google Cloud Anda. ADK memerlukan hal ini untuk mengaitkan agen Anda dengan resource cloud Anda secara benar dan untuk mengaktifkan penagihan.GOOGLE_CLOUD_LOCATION: Menentukan region Google Cloud tempat resource Vertex AI Anda berada (misalnya,us-central1). Menggunakan lokasi yang benar akan memastikan agen Anda dapat berkomunikasi secara efektif dengan layanan Vertex AI di region tersebut.
Agent Development Kit juga menawarkan cara mudah untuk meluncurkan agen Anda sebagai aplikasi chat menggunakan UI pengembangannya. Cukup gunakan perintah adk web.
adk webAnda akan melihat output yang serupa di terminal:
...
INFO:     Started server process [4978]
INFO:     Waiting for application startup.

+------------------------------------------------------+
| ADK Web Server started                               |
|                                                      |
| For local testing, access at http://localhost:8000.  |
+------------------------------------------------------+

INFO:     Application startup complete.
INFO:     Uvicorn running on http://127.0.0.1:8000 (Press CTRL+C to quit)
Anda memiliki dua opsi untuk mengakses UI pengembangan:
- Membuka melalui Terminal
- Ctrl + Klik atau Cmd + Klik pada link (misalnya, http://localhost:8000) seperti yang ditampilkan di terminal.
- Buka melalui Pratinjau Web
- Klik tombol Pratinjau Web,
- Pilih Ubah Port.
- Masukkan nomor port (misalnya, 8000)
- Klik Ubah dan Pratinjau
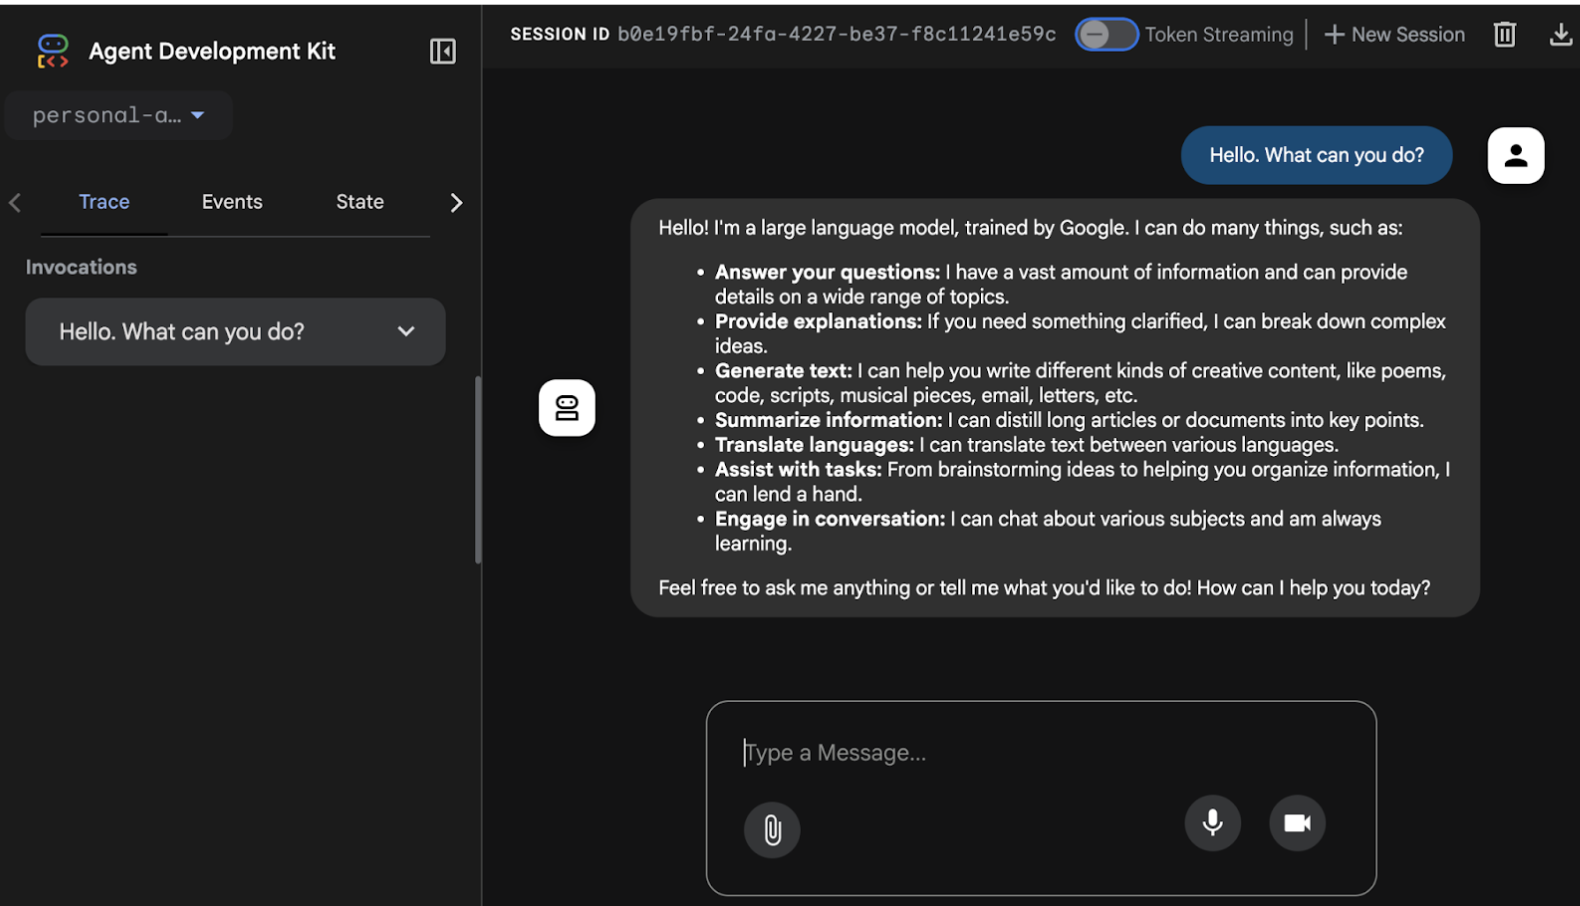
Kemudian, Anda akan melihat UI seperti aplikasi chat muncul di browser. Mulai percakapan dengan asisten pribadi Anda melalui antarmuka ini.
Anda akan melihat bahwa format Markdown kini ditampilkan dengan benar, dan UI ini juga memungkinkan Anda men-debug dan menyelidiki setiap peristiwa pesan, status agen, permintaan pengguna, dan banyak lagi. Selamat chatting!
Pada tahap ini, Anda seharusnya sudah tahu cara membangun agen AI sederhana menggunakan ADK dan menjalankannya di UI Pengembangan.
Bayangkan Anda sedang bersiap untuk melakukan perjalanan ke Jepang bulan depan dan perlu memeriksa nilai tukar mata uang saat ini. Tanyakan kepada agen "Berapa nilai tukar dari dolar Singapura ke yen Jepang?"
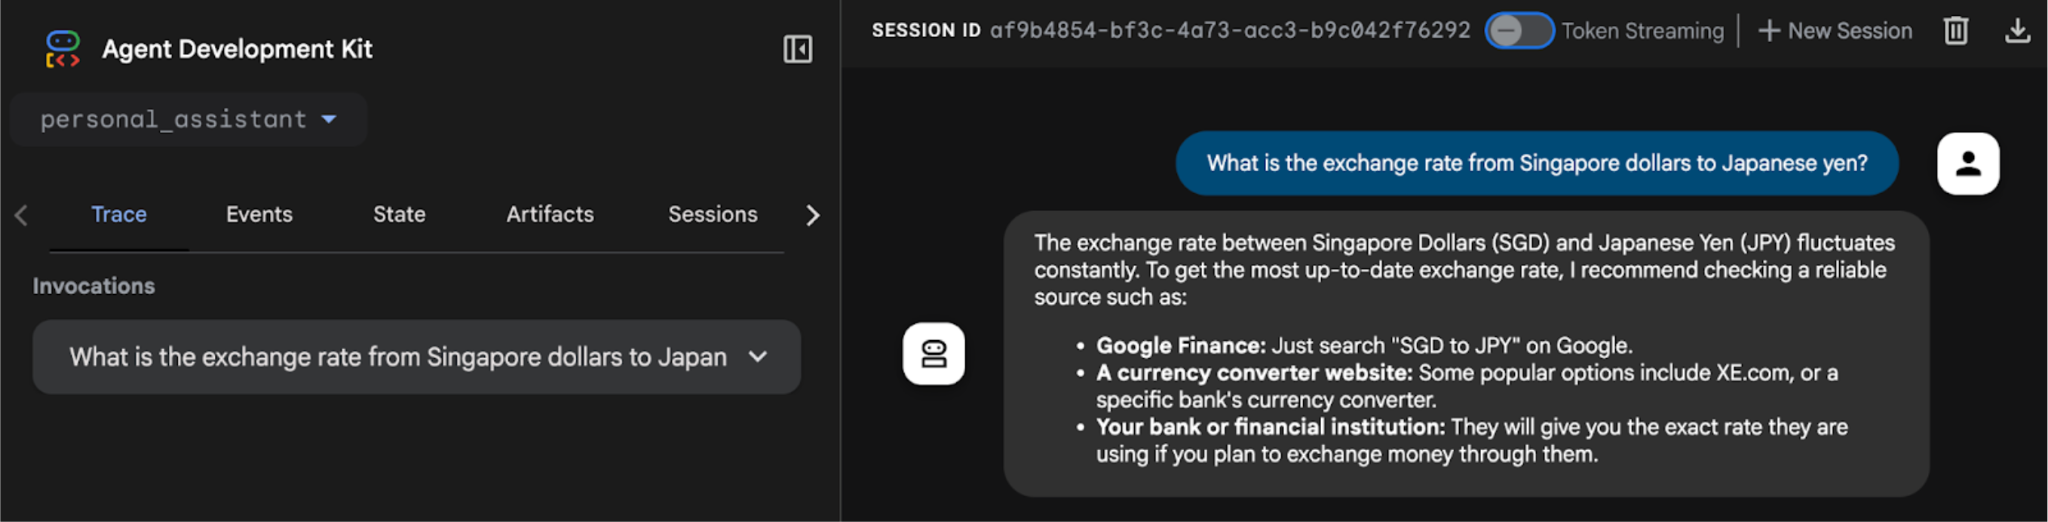
Anda akan melihat bahwa agen tidak dapat mengambil nilai tukar real-time. Hal ini karena saat ini agen tidak memiliki akses internet dan konektivitas sistem eksternal. Meskipun agen membalas dengan suatu nilai, sulit untuk memercayai nilai tersebut karena kemungkinan besar merupakan halusinasi.
Untuk mengatasi hal ini, kita akan menerapkan fungsi Python untuk mengambil nilai tukar melalui REST API dan mengintegrasikannya sebagai Alat Fungsi untuk agen.
Hentikan proses agen yang sedang berjalan menggunakan pintasan keyboard Ctrl + C di jendela terminal.
Buat file custom_functions.py
Buat file Python bernama custom_functions.py di folder personal_assistant dengan mengetik perintah ini di terminal:
touch personal_assistant/custom_functions.pyBerikut tampilan struktur folder Anda:
ai-agents-adk/
└── personal_assistant/
    ├── .env
    ├── __init__.py
    ├── agent.py
    └── custom_functions.py
Buka custom_functions.py di Code Editor. File ini akan berisi fungsi Python yang bertanggung jawab untuk mengambil data nilai tukar dari API eksternal.
Salin dan tempel kode berikut di dalam:
import requests


# define a function to get exchange rate
def get_fx_rate(base: str, target: str):
        """
        Fetches the current exchange rate between two currencies.


        Args:
                base: The base currency (e.g., "SGD").
                target: The target currency (e.g., "JPY").


        Returns:
                The exchange rate information as a json response,
                or None if the rate could not be fetched.
        """
        base_url = "https://hexarate.paikama.co/api/rates/latest"
        api_url = f"{base_url}/{base}?target={target}"


        response = requests.get(api_url)
        if response.status_code == 200:
return response.json()Sekarang, edit file agent.py: impor fungsi get_fx_rate dan tetapkan sebagai FunctionTool.
Perbarui file agent.py
Salin blok kode ini dan ganti konten file agent.py yang ada:
from google.adk.agents import Agent
from google.adk.tools import FunctionTool


from .custom_functions import get_fx_rate


root_agent = Agent(
    model='gemini-2.5-flash',
    name='root_agent',
    description='A helpful assistant for user questions.',
    instruction='Answer user questions to the best of your knowledge',
    tools=[FunctionTool(get_fx_rate)]
)Setelah perubahan, mulai ulang agen dengan mengetik:
adk webSaat agen sudah aktif, ajukan pertanyaan yang sama lagi, "Berapa nilai tukar dari dolar Singapura ke yen Jepang?"
Kali ini, Anda akan melihat nilai tukar sebenarnya yang diberikan oleh alat get_fx_rate.
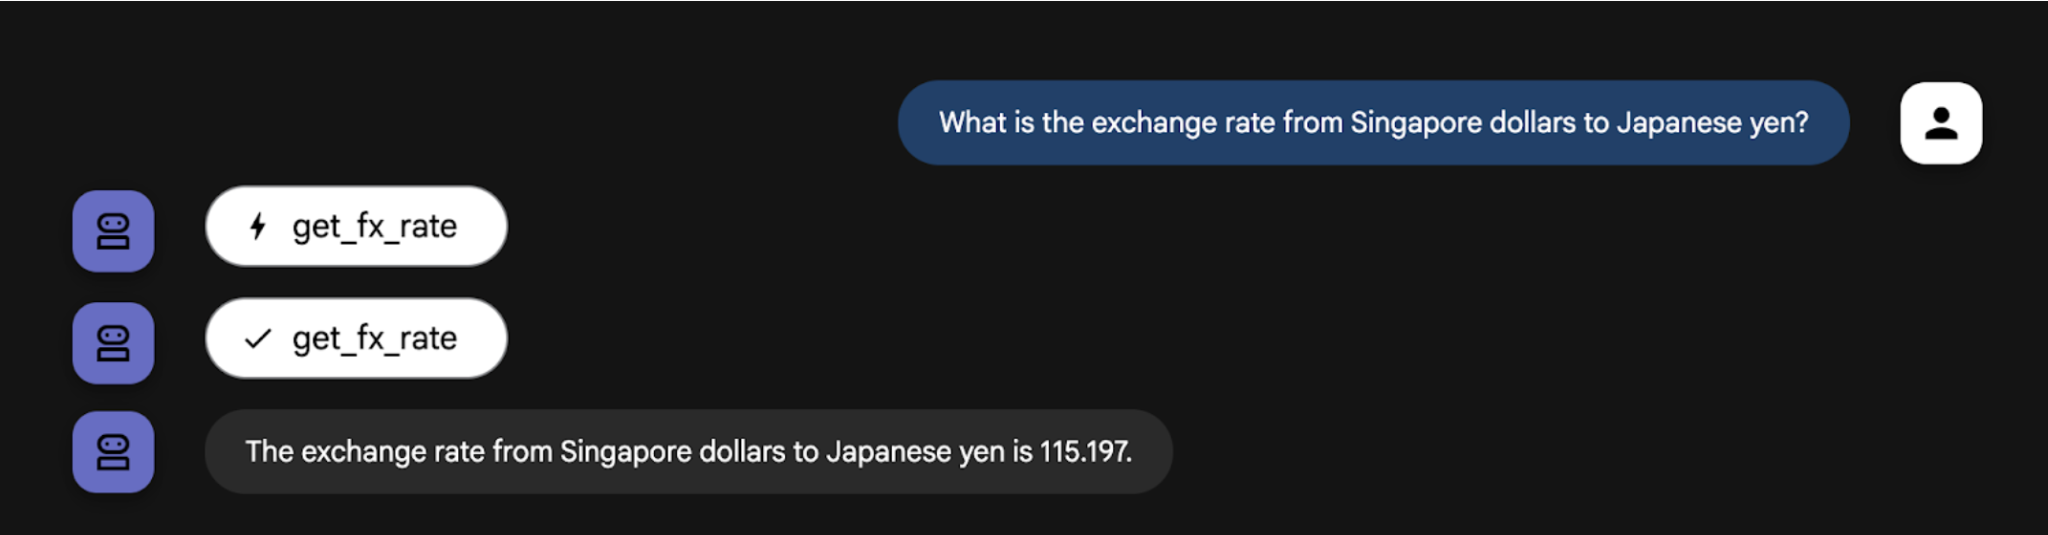
Jangan ragu untuk mengajukan pertanyaan terkait penukaran mata uang yang Anda inginkan.
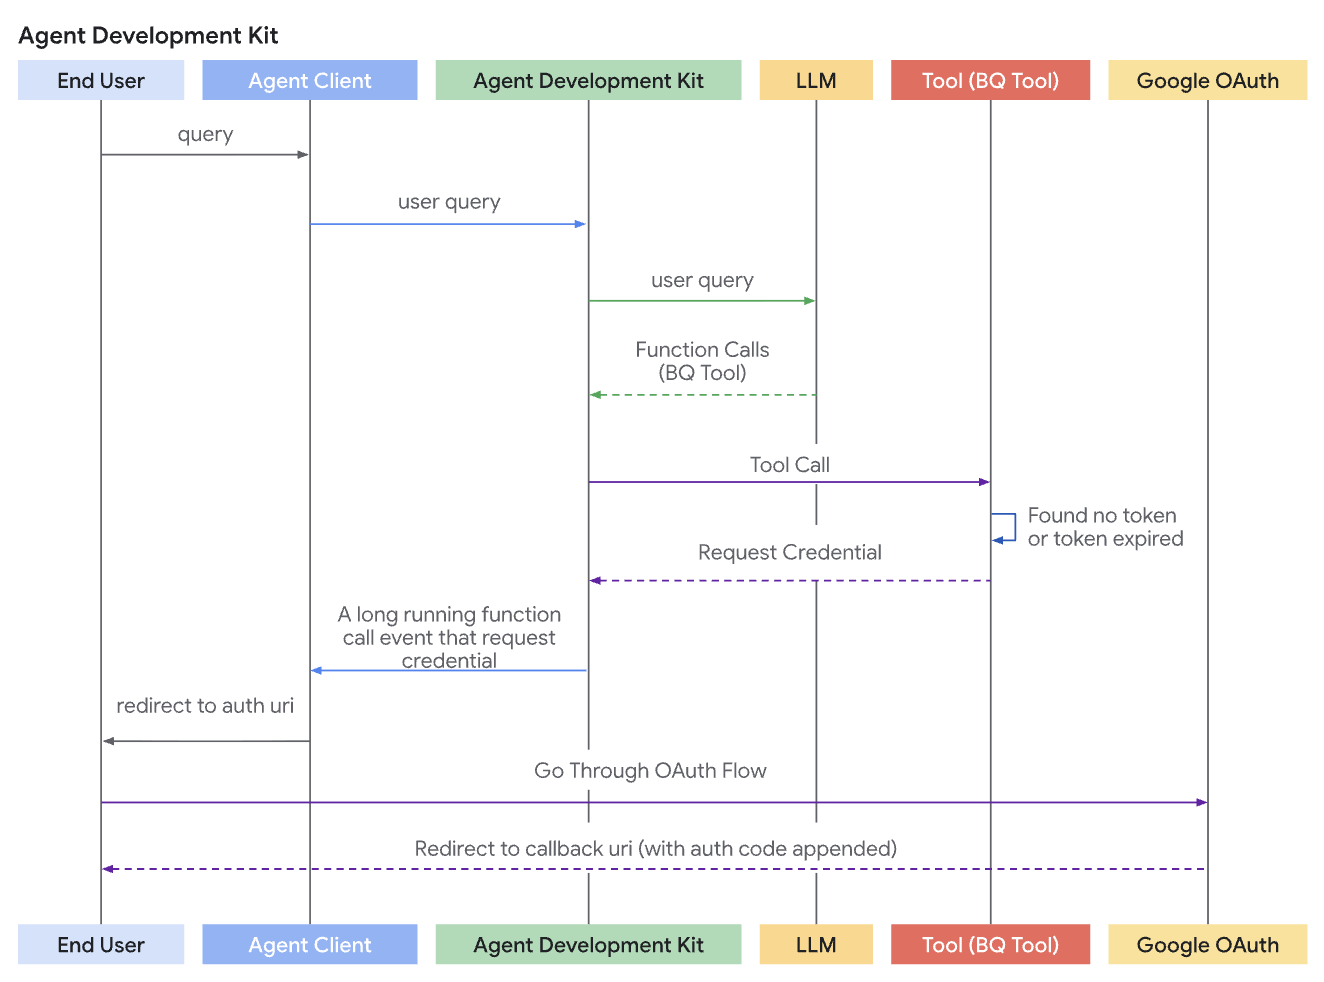
Berikut ini adalah alur ketika Anda ingin mengakses data yang membutuhkan autentikasi menggunakan OAuth pada tool.
Membuat OAuth 2.0 Credential dan Calendar API di GCP
Langkah ini membutuhkan Client ID dan Client Secret Google untuk melakukan pertukaran token.
Langkah 1: Buat Proyek Google Cloud
- Buka Google Cloud Console dan buat proyek baru.
- Aktifkan API yang diperlukan untuk tool Anda (misalnya, jika Anda mengakses Google Kalender, aktifkan "Google Calendar API").
Langkah 2: Konfigurasi Layar Persetujuan OAuth (OAuth Consent Screen)
- Di Google Cloud Console, buka APIs & Services > OAuth consent screen.
- Konfigurasi nama aplikasi, logo, email dukungan, dan domain yang diizinkan. Inilah yang dilihat pengguna saat mereka memberikan izin .
Langkah 3: Dapatkan Kredensial Klien OAuth 2.0
- Buka APIs & Services > Credentials.
- Klik + Create Credentials dan pilih OAuth client ID.
- Pilih Web application sebagai Tipe Aplikasi.
- Yang terpenting, di bawah Authorized redirect URIs, Anda harus menambahkan URL pengalihan (redirect URL) yang digunakan oleh lingkungan klien ADK Anda. Ini biasanya disediakan oleh lingkungan yang menghosting agen Anda (misalnya,
https://untuk testing di adk web)./dev-ui/ 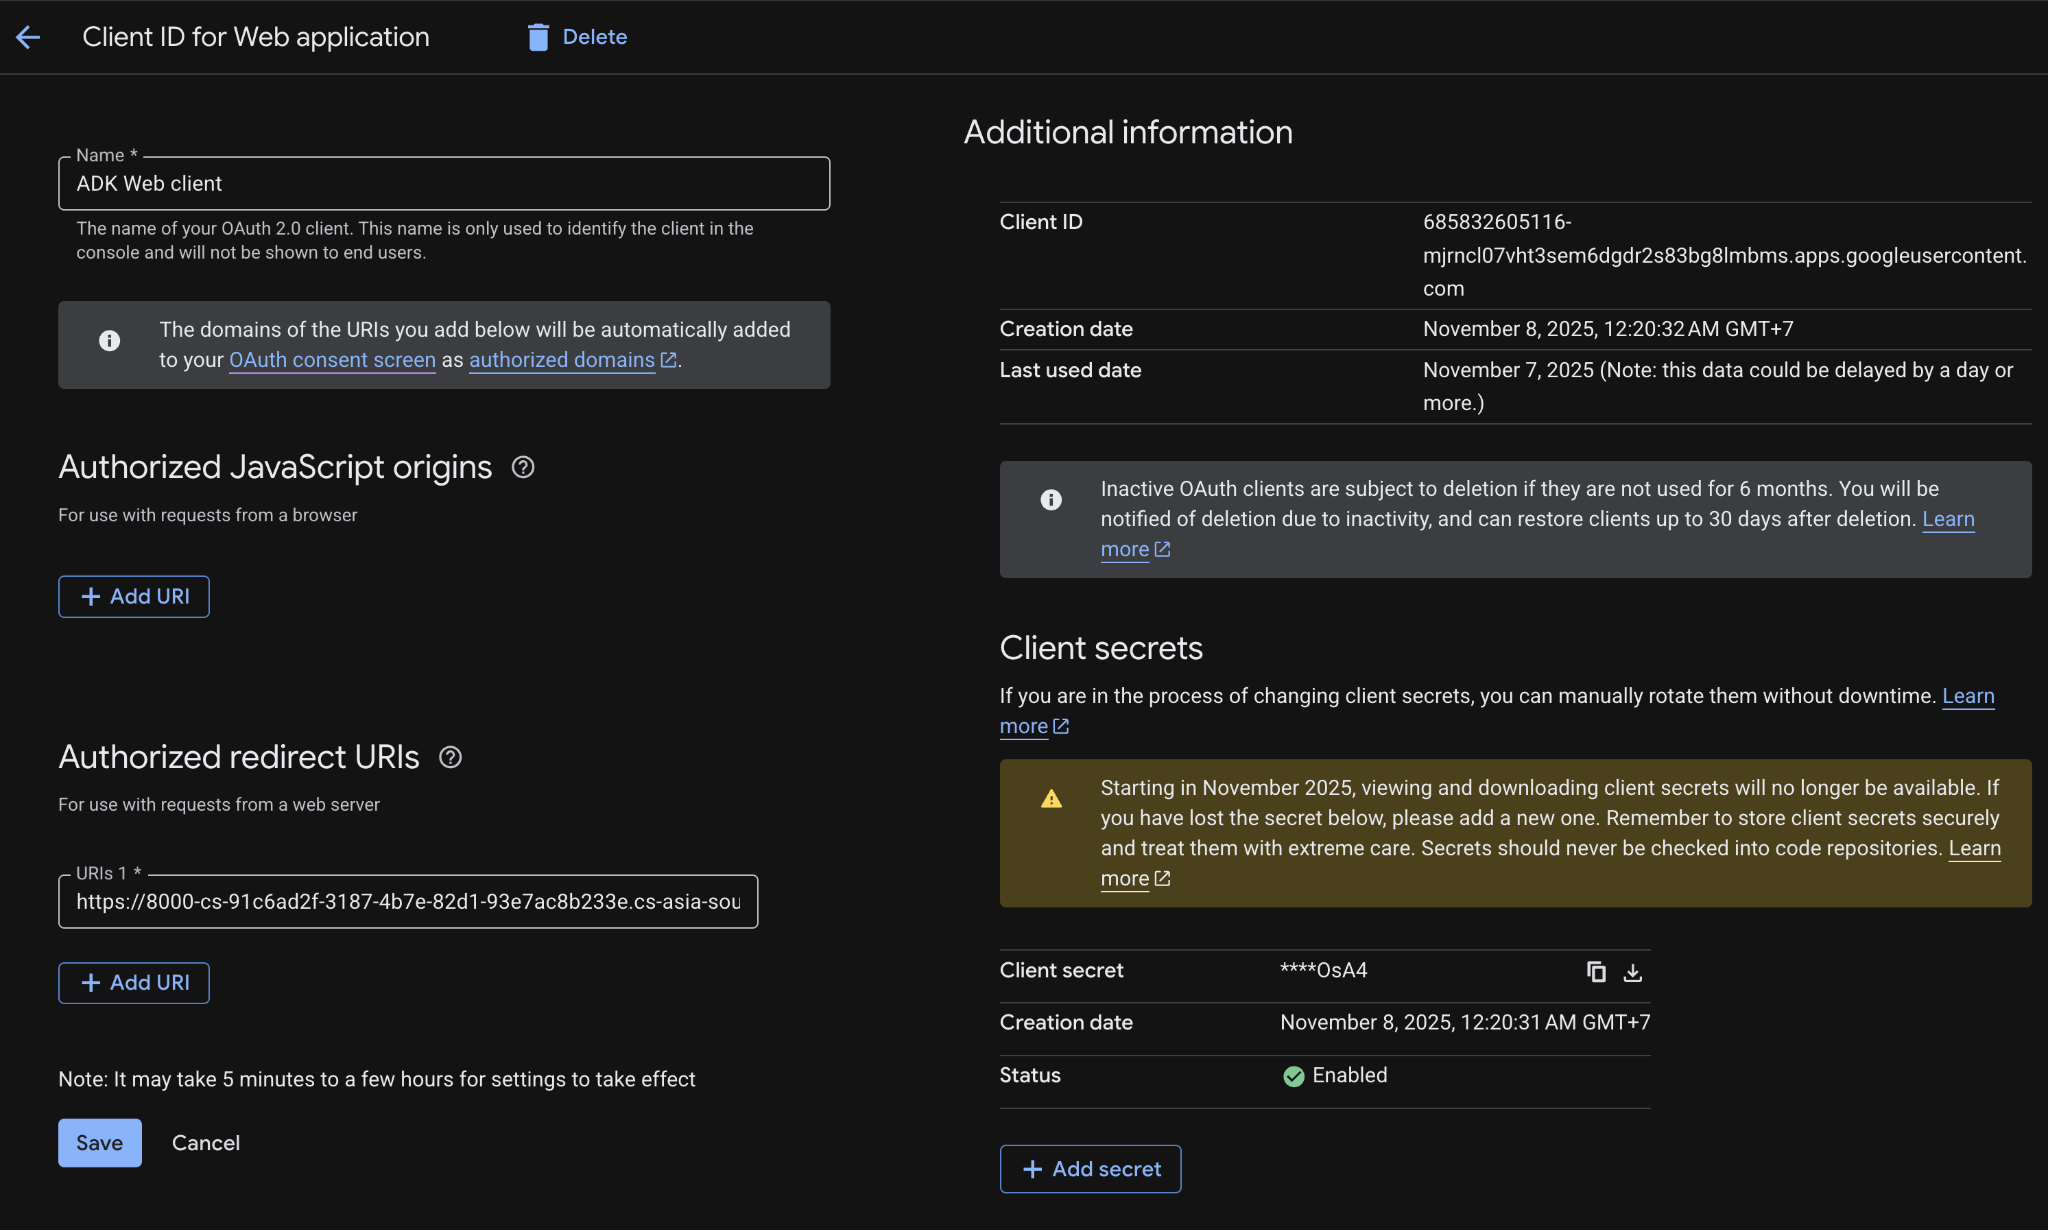
- Klik Create.
- Catat Client ID dan Client Secret yang dihasilkan.
Langkah 4: Aktifkan Google Calendar API
Untuk dapat memanggil Google Calendar API, Anda harus enable API tersebut dari GCP.
- Buka halaman https://console.cloud.google.com/marketplace/product/google/calendar-json.googleapis.com
- Klik tombol `Enable` untuk mengaktifkan.
Definisikan Google Api Tool (Calendar)
Komponen ini memegang titik akhir (endpoints) standar untuk OAuth 2.0 Google menggunaan built-in tool milik Google untuk mengakses data Google Calendar Anda.
agent.py
from google.adk.agents.llm_agent import Agent
from google.adk.tools import FunctionTool
from google.adk.tools.google_api_tool import CalendarToolset

from .custom_functions import get_fx_rate

oauth_client_id = "<put-your-client-id>"
oauth_client_secret = "<put-your-client-secret>"

calendar_toolset = CalendarToolset(
   client_id=oauth_client_id,
   client_secret=oauth_client_secret,
)
root_agent = Agent(
   model='gemini-2.5-flash',
   name='root_agent',
   description='A helpful assistant for user questions.',
   instruction='Answer user questions to the best of your knowledge',
   tools=[FunctionTool(get_fx_rate), calendar_toolset],
)
Jalankan kembali adk web dan tanyakan apapun yang membutuhkan data dari Google Calendar, misalnya: "Apa agenda saya tanggal 11 Nov 2025?"
adk webStep 0: Tambahkan tool_context pada tool function
Parameter pada fungsi Anda harus menyertakan tool_context: ToolContext. ADK akan secara otomatis mengisi objek ini, menyediakan akses ke mekanisme status dan autentikasi.
Tambahkan script berikut pada custom_functions.py.
import requests
from fastapi.openapi.models import OAuth2
from fastapi.openapi.models import OAuthFlowAuthorizationCode
from fastapi.openapi.models import OAuthFlows
from google.adk.tools import ToolContext
from google.oauth2.credentials import Credentials
from google.auth.transport.requests import Request
from google.adk.auth.auth_credential import AuthCredential, AuthCredentialTypes, OAuth2Auth
from google.adk.auth import AuthConfig
import json

oauth_client_id = "YOUR_CLIENT_ID"
oauth_client_secret = "YOUR_CLIENT_SECRET"

auth_scheme = OAuth2(
   flows=OAuthFlows(
       authorizationCode=OAuthFlowAuthorizationCode(
           authorizationUrl="https://accounts.google.com/o/oauth2/auth",
           tokenUrl="https://oauth2.googleapis.com/token",
           scopes={
               "https://www.googleapis.com/auth/calendar": "calendar scope"
           },
       )
   )
)

auth_credential = AuthCredential(
   auth_type=AuthCredentialTypes.OAUTH2,
   oauth2=OAuth2Auth(
       client_id=oauth_client_id,
       client_secret=oauth_client_secret
   ),
)

# define a function to get exchange rate
def get_fx_rate(base: str, target: str, tool_context: ToolContext):
Step 1: Validasi dan cek credential di cache
Tambahkan script berikut ini di custom_function.py untuk validasi dan pengecekan apakah sudah ada credential yang disimpan di cache.
Di dalam fungsi alat Anda, pertama-tama periksa apakah kredensial yang valid (misalnya, access/refresh token) sudah tersimpan dari proses sebelumnya di sesi ini. Kredensial untuk sesi saat ini harus disimpan di tool_context.invocation_context.session.state. Periksa keberadaan kredensial yang ada dengan mengecek tool_context.invocation_context.session.state.get(credential_name, None).
custom_function.py
# define a function to get exchange rate
def get_fx_rate(base: str, target: str, tool_context: ToolContext):
       """
       Fetches the current exchange rate between two currencies.

       Args:
               base: The base currency (e.g., "SGD").
               target: The target currency (e.g., "JPY").

       Returns:
               The exchange rate information as a json response,
               or None if the rate could not be fetched.
       """

       TOKEN_CACHE_KEY = "my_tool_tokens" # Choose a unique key

       creds = None
       cached_token_info = tool_context.state.get(TOKEN_CACHE_KEY)
       if cached_token_info:
               try:
                       creds = Credentials.from_authorized_user_info(cached_token_info)
                       # if not creds.valid and creds.expired and creds.refresh_token:
                       #         creds.refresh(Request())
                       #         tool_context.state[TOKEN_CACHE_KEY] = json.loads(creds.to_json()) # Update cache
                       # elif not creds.valid:
                       #         creds = None # Invalid, needs re-auth
                       #         tool_context.state[TOKEN_CACHE_KEY] = None
               except Exception as e:
                       print(f"Error loading/refreshing cached creds: {e}")
                       creds = None
                       tool_context.state[TOKEN_CACHE_KEY] = None

       if creds and creds.valid:
               # Proceed to Step 6

               try:
                       # Proceed to Step 7

                       base_url = "https://hexarate.paikama.co/api/rates/latest"
                       api_url = f"{base_url}/{base}?target={target}"

                       response = requests.get(api_url)
                       if response.status_code == 200:
                               return response.json()

               except Exception as e:
                       # Handle API errors (e.g., check for 401/403, maybe clear cache and re-request auth)
                       print(f"ERROR: API call failed: {e}")
                       return {"status": "error", "error_message": f"API call failed: {e}"}

               pass
       else:
               # Proceed to Step 2
Step 2: Check for Auth Response from Client
- If Step 1 didn't yield valid credentials, check if the client just completed the interactive flow by calling exchanged_credential = tool_context.get_auth_response().
- This returns the updated exchanged_credential object sent back by the client (containing the callback URL in auth_response_uri).
Ubah # Proceed to Step 2 dengan script berikut ini:
# Use auth_scheme and auth_credential configured in the tool.
# exchanged_credential: AuthCredential | None

exchanged_credential = tool_context.get_auth_response(AuthConfig(
       auth_scheme=auth_scheme,
       raw_auth_credential=auth_credential,
))
# If exchanged_credential is not None, then there is already an exchanged credetial from the auth response.
if exchanged_credential:
       # ADK exchanged the access token already for us
       access_token = exchanged_credential.oauth2.access_token
       refresh_token = exchanged_credential.oauth2.refresh_token
       creds = Credentials(
               token=access_token,
               refresh_token=refresh_token,
               token_uri=auth_scheme.flows.authorizationCode.tokenUrl,
               client_id=auth_credential.oauth2.client_id,
               client_secret=auth_credential.oauth2.client_secret,
               scopes=list(auth_scheme.flows.authorizationCode.scopes.keys()),
       )
       # Cache the token in session state and call the API, skip to step 5

       # Proceed to Step 5
else:
       # Proceed to Step 3


pass
Step 3: Initiate Authentication Request
If no valid credentials (Step 1.) and no auth response (Step 2.) are found, the tool needs to start the OAuth flow. Define the AuthScheme and initial AuthCredential and call tool_context.request_credential(). Return a response indicating authorization is needed.
Ubah # Proceed to Step 3... dengan script berikut ini:
# Step 3
# Use auth_scheme and auth_credential configured in the tool.
tool_context.request_credential(AuthConfig(
auth_scheme=auth_scheme,
raw_auth_credential=auth_credential,
))
return {'pending': True, 'message': 'Awaiting user authentication.'}

# By setting request_credential, ADK detects a pending authentication event. It pauses execution and ask end user to login.
Step 4: Exchange Authorization Code for Tokens
ADK automatically generates OAuth authorization URL and presents it to your Agent Client application. Your Agent Client application should follow the same way described in Journey 1 to redirect the user to the authorization URL (with redirect_uri appended). Once a user completes the login flow following the authorization URL and ADK extracts the authentication callback url from Agent Client applications, automatically parses the auth code, and generates auth token. At the next Tool call, tool_context.get_auth_response in step 2 will contain a valid credential to use in subsequent API calls.
Step 5: Cache Obtained Credentials
After successfully obtaining the token from ADK (Step 2) or if the token is still valid (Step 1), immediately store the new Credentials object in tool_context.state (serialized, e.g., as JSON) using your cache key.
Ubah # Process to Step 5 dengan script berikut ini:
# Step 5
# Inside your tool function, after obtaining 'creds' (either refreshed or newly exchanged)
# Cache the new/refreshed tokens
tool_context.state[TOKEN_CACHE_KEY] = json.loads(creds.to_json())
print(f"DEBUG: Cached/updated tokens under key: {TOKEN_CACHE_KEY}")
Step 6: Make Authenticated API Call
- Once you have a valid Credentials object (creds from Step 1 or Step 4), use it to make the actual call to the protected API using the appropriate client library (e.g., googleapiclient, requests). Pass the credentials=creds argument.
- Include error handling, especially for HttpError 401/403, which might mean the token expired or was revoked between calls. If you get such an error, consider clearing the cached token (tool_context.state.pop(...)) and potentially returning the auth_required status again to force re-authentication.
Ubah Proceed to Step 6 (Make API Call) dengan script berikut ini:
# Step 6
# Inside your tool function, using the valid 'creds' object
# Ensure creds is valid before proceeding
if not creds or not creds.valid:
       return {"status": "error", "error_message": "Cannot proceed without valid credentials."}

try:
       service = build("calendar", "v3", credentials=creds) # Example
       api_result = service.events().list(...).execute()
# Proceed to Step 7
except Exception as e:
       # Handle API errors (e.g., check for 401/403, maybe clear cache and re-request auth)
       print(f"ERROR: API call failed: {e}")
       return {"status": "error", "error_message": f"API call failed: {e}"}
Step 7: Return Tool Result
- After a successful API call, process the result into a dictionary format that is useful for the LLM.
- Crucially, include a along with the data.
# Step 7
return {"status": "success", "data": response}
Hasil akhir:
import requests
from fastapi.openapi.models import OAuth2
from fastapi.openapi.models import OAuthFlowAuthorizationCode
from fastapi.openapi.models import OAuthFlows
from google.adk.tools import ToolContext
from google.oauth2.credentials import Credentials
from google.auth.transport.requests import Request
from google.adk.auth.auth_credential import AuthCredential, AuthCredentialTypes, OAuth2Auth
from google.adk.auth import AuthConfig
import json

oauth_client_id = "YOUR_CLIENT_ID"
oauth_client_secret = "YOUR_CLIENT_SECRET"

auth_scheme = OAuth2(
   flows=OAuthFlows(
       authorizationCode=OAuthFlowAuthorizationCode(
           authorizationUrl="https://accounts.google.com/o/oauth2/auth",
           tokenUrl="https://oauth2.googleapis.com/token",
           scopes={
               "https://www.googleapis.com/auth/calendar": "calendar scope"
           },
       )
   )
)

auth_credential = AuthCredential(
   auth_type=AuthCredentialTypes.OAUTH2,
   oauth2=OAuth2Auth(
       client_id=oauth_client_id,
       client_secret=oauth_client_secret
   ),
)

# define a function to get exchange rate
def get_fx_rate(base: str, target: str, tool_context: ToolContext):
       """
       Fetches the current exchange rate between two currencies.

       Args:
               base: The base currency (e.g., "SGD").
               target: The target currency (e.g., "JPY").

       Returns:
               The exchange rate information as a json response,
               or None if the rate could not be fetched.
       """

       TOKEN_CACHE_KEY = "my_tool_tokens" # Choose a unique key

       creds = None
       cached_token_info = tool_context.state.get(TOKEN_CACHE_KEY)
       if cached_token_info:
               try:
                       creds = Credentials.from_authorized_user_info(cached_token_info)
                       # if not creds.valid and creds.expired and creds.refresh_token:
                       #         creds.refresh(Request())
                       #         tool_context.state[TOKEN_CACHE_KEY] = json.loads(creds.to_json()) # Update cache
                       # elif not creds.valid:
                       #         creds = None # Invalid, needs re-auth
                       #         tool_context.state[TOKEN_CACHE_KEY] = None
               except Exception as e:
                       print(f"Error loading/refreshing cached creds: {e}")
                       creds = None
                       tool_context.state[TOKEN_CACHE_KEY] = None

       if creds and creds.valid:

               # Step 6
               # Inside your tool function, using the valid 'creds' object
               # Ensure creds is valid before proceeding
               if not creds or not creds.valid:
                       return {"status": "error", "error_message": "Cannot proceed without valid credentials."}

               try:
                       base_url = "https://hexarate.paikama.co/api/rates/latest"
                       api_url = f"{base_url}/{base}?target={target}"

                       response = requests.get(api_url)
                       if response.status_code == 200:
                               # Step 7
                               return {"status": "success", "data": response}

               except Exception as e:
                       # Handle API errors (e.g., check for 401/403, maybe clear cache and re-request auth)
                       print(f"ERROR: API call failed: {e}")
                       return {"status": "error", "error_message": f"API call failed: {e}"}

               pass
       else:
               # Step 2
               # Use auth_scheme and auth_credential configured in the tool.
               # exchanged_credential: AuthCredential | None

               exchanged_credential = tool_context.get_auth_response(AuthConfig(
                       auth_scheme=auth_scheme,
                       raw_auth_credential=auth_credential,
               ))
               # If exchanged_credential is not None, then there is already an exchanged credetial from the auth response.
               if exchanged_credential:
                       # ADK exchanged the access token already for us
                       access_token = exchanged_credential.oauth2.access_token
                       refresh_token = exchanged_credential.oauth2.refresh_token
                       creds = Credentials(
                               token=access_token,
                               refresh_token=refresh_token,
                               token_uri=auth_scheme.flows.authorizationCode.tokenUrl,
                               client_id=auth_credential.oauth2.client_id,
                               client_secret=auth_credential.oauth2.client_secret,
                               scopes=list(auth_scheme.flows.authorizationCode.scopes.keys()),
                       )
                       # Cache the token in session state and call the API, skip to step 5

                       # Step 5
                       # Inside your tool function, after obtaining 'creds' (either refreshed or newly exchanged)
                       # Cache the new/refreshed tokens
                       tool_context.state[TOKEN_CACHE_KEY] = json.loads(creds.to_json())
                       print(f"DEBUG: Cached/updated tokens under key: {TOKEN_CACHE_KEY}")
               else:
                       # Step 3
                       # Use auth_scheme and auth_credential configured in the tool.
                       tool_context.request_credential(AuthConfig(
                               auth_scheme=auth_scheme,
                               raw_auth_credential=auth_credential,
                       ))
                       return {'pending': True, 'message': 'Awaiting user authentication.'}

                       # By setting request_credential, ADK detects a pending authentication event. It pauses execution and ask end user to login.


               pass
Catatan: Anda tidak perlu melakukan langkah ini jika berencana untuk melanjutkan seri ini. Jika Anda mengikuti codelab ini secara langsung dengan instruktur, instruktur Anda akan memberikan petunjuk lebih lanjut tentang langkah-langkah yang harus dilakukan.
Karena codelab ini tidak melibatkan produk yang berjalan lama, cukup hentikan sesi agen aktif Anda (misalnya, instance adk web di terminal Anda) dengan menekan Ctrl + C atau Cmd + C di terminal.
Menghapus Folder dan File Project Agent
Jika Anda hanya ingin menghapus kode dari lingkungan Cloud Shell, gunakan perintah berikut:
cd ~
rm -rf ai-agents-adk
Menonaktifkan Vertex AI API
Untuk menonaktifkan Vertex AI API yang diaktifkan sebelumnya, jalankan perintah ini:
gcloud services disable aiplatform.googleapis.comMenghentikan Seluruh Project Google Cloud
Jika Anda ingin menonaktifkan project Google Cloud sepenuhnya, lihat panduan resmi untuk mengetahui petunjuk selengkapnya.
Selamat! Anda telah berhasil membuat agen asisten pribadi sederhana menggunakan Agent Development Kit (ADK). Sekarang Anda memiliki dasar dan pemahaman yang kuat tentang komponen inti agen ADK dan mencoba membuat tool yang membutuhkan autentikasi OAuth.
Sebagai langkah berikutnya, pelajari ADK dengan merujuk kepada dokumentasi resminya di https://google.github.io/adk-docs/